Hand Evaluation Made Tangible – Part 2: Splinter Bids
TOM VAN OVERBEEKE
Tom van Overbeeke (1994) holds a Dutch Master degree in Mathematical Sciences. He won a bronze medal in the 2017 Cavendish in Monaco. He also won two silver medals at World Youth Championships (2014 teams, 2015 BAM) and two silver (2012 pairs, 2019 teams) and bronze (2013 teams) at European Youth Championships. He has played in the Dutch highest division for over 10 years, apart from the year he lived in Norway, where he played in the Norwegian highest division.
If you ask a top player why he thought his hand was good enough to attempt or accept a slam try, you will usually get one of the following two answers:
- I filled in a number of hands for partner and in the majority of the hands the slam was good (enough).
- I felt I had extra values for my bidding, based on [xyz] assets in my hand.
It will probably not surprise you that the first method is more accurate than the second. That is why the bidding systems of top players are based on providing as detailed a picture of the hand as possible, usually with the help of relays and other gadgets. However, for this series, intended to give substance to hand evaluation, the second method is our focus. For example, we are in a particular bidding sequence and have to assess whether our hand is good enough, for example, to accept a slam try.
1NT opening against a splinter
Today we look at a specific auction:
| West | North | East | South |
|---|---|---|---|
| 1NT | pass | 2 | pass |
2 | pass | 4 | pass |
After a 15-17 NT opening by west, EW find their heart fit via Stayman and east jumps to 4, a splinter. West now has three options: sign-off with 4, bid Last Train with 4 , or go beyond 4 (directly or after Last Train). Similar to the previous article, we performed a data-science study to quantify the value of the various honours and distributions. We already saw in the previous article that trump honours are worth more than side-suit honours. Now, because partner has a singleton club, the honours in spades and diamonds will become more valuable, and those in clubs less so.
To make this problem more tangible, we use the following hand as an example:
 9 7 4 2 A K 10 6 Q J A K 2.
This is a hand with positives and negatives. We have three of the five keycards, but no controls in spades and diamonds. The king of clubs is not very productive. On the other hand, we do have 17 points for our 15-17 NT bid. Do we sign-off or opt for Last Train?
The study
The starting point of this study is a simulation of 100,000 hands that meet the following requirements:
- West is 15-17 balanced, with at least a four-card heart suit, i.e., a 4
 -4-3-2, a 4-3-3-3 or a 5-3-3-2. In practice, a 5-3-3-2 with 14 points is also possible for many top players, but we will ignore that for now.
 - East is in principle unlimited, but hands that would continue over a sign-off are less interesting for our study. Thus, we give east 12-14 points. He started with Stayman, but he can still hold a five-card major if he has a four-card in the other major (assuming we use of Smolen). For convenience, we assume he does not have a six-card, because then the splinter is no longer the strength of his hand.
From the 100,000 west hands, we distil which honours he holds and categorize the distribution, paying specific attention to the number of hearts and clubs. Just like in the previous article, we perform a regression analysis to assign a value to the various honours and distributions. We scale the values such that the honours together are worth forty points. You can find the results in Figure 1.
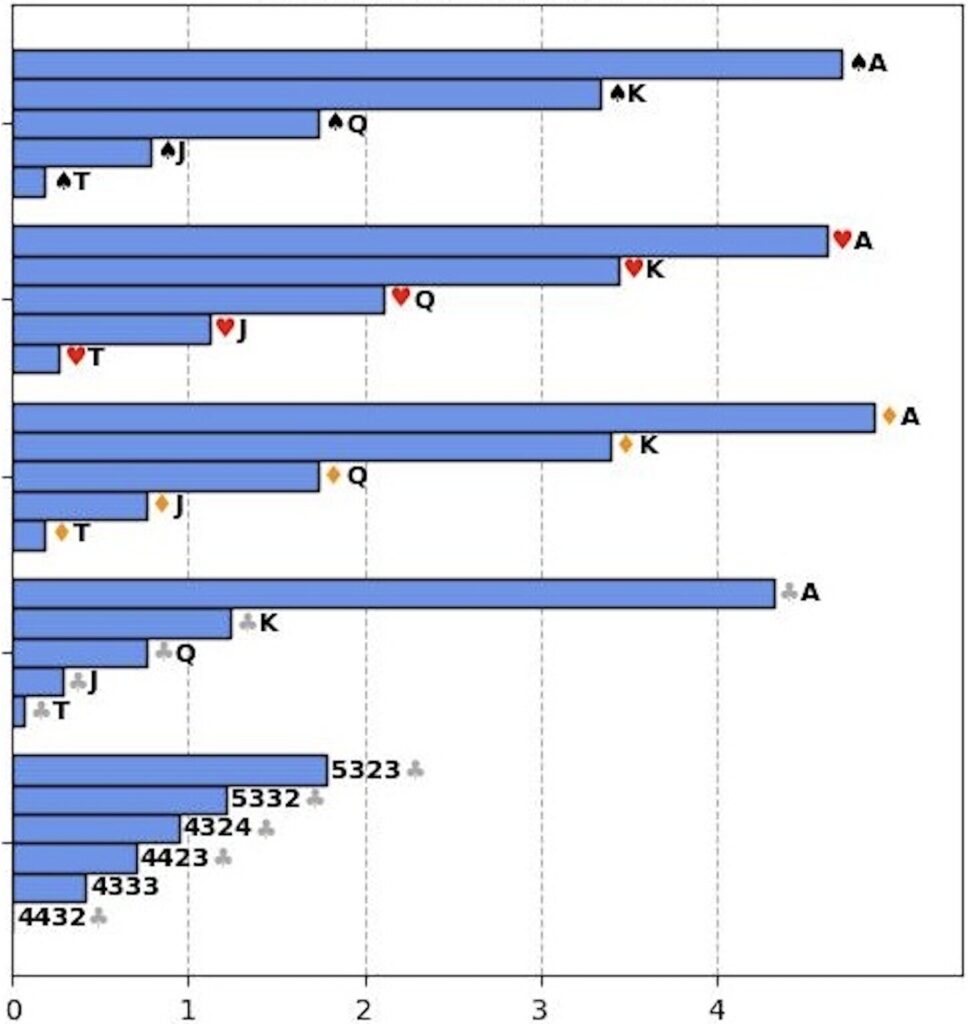
Figure 1: Values of honours and distributions of 1NT hand after heart fit and club splinter
Honours
We can draw a number of conclusions about the value of the various honours.
K, Q, and J are indeed worth significantly less than you originally counted for them. Whether or not you have these cards should have a significant effect on your hand evaluation. Not a groundbreaking conclusion, but still nice that this is supported by the study.
Beforehand I found the value of A interesting, because A is quite a binary variable. If partner has a void, these are likely wasted points (unless you are in danger of losing control of the hand), but if partner has a singleton, the ace ensures that you don’t have a loser in clubs. Aces are generally very good for slam, and the conclusion turns out to be that it is worth the four points you counted for it. However, it is worth less than the combined value of a side-suit king and the jack of trumps, and also less than the other aces.
Looking at the other side suits (spades and diamonds), we see that aces and kings are very good. The same applies for the lower trump honours. Queens and jacks in the side suits are worth less, but still more than the club honours
Interestingly, according to this model, A is more valuable than A. A is also worth more, although that difference is smaller. In the previous study, we saw that the trump ace is initially actually the best card in the game. So where does this difference come from? I suspect there are two causes. First, the difference between the trump ace and other aces for slam will be smaller than at lower bidding levels. For a slam, you may only lose one trick, and every missing ace is such a trick (unless partner has a void). The second (and more important) reason is that the probability is higher that partner has this trump ace than that partner has another ace. After all, partner has more hearts on average than spades or diamonds. Note that partner also has more spades than diamonds on average (he might have a 5-5 major, but not a 5-5 hearts-diamonds), making A the most valuable. Partner’s short clubs are already known, making a missing A less of a problem.
Hand distribution
Hand distribution is a characteristic that receives significantly less attention than honour value, especially in case of a splinter. Yet, it turns out to have a significant effect on the evaluation of the hand. Roughly speaking, it comes down to two conclusions:
- First, a five-card heart suit is a huge asset. This actually speaks for itself. It turns out that this is worth about one and a half bonus points, depending on the number of clubs.
- Second, the more clubs you have, the better your hand is.
It is worthwhile to reflect for a moment on the second conclusion. Of course, the more clubs you have, the more ruffs you can make in dummy. But it also concerns spades and diamonds. If you have fewer clubs, you have more cards in the side suits, and this increases the risk of losers in those suits. The consequence is that in this bidding sequence, a 4-4-3-2 is the worst distribution you can have, even worse than a 4-3-3-3.
The difference between a 4-4-3-2 with two clubs or a 4-4-3-2 with four clubs is approximately one point. An example to illustrate this: the hands A 4 3 2 K Q J 2 A J 2 5 4 and A 4 K Q J 2 A J 2 5 4 3 2 both have no wasted points opposite a club splinter. Nevertheless, slam is hopeless with the first hand opposite K 7 6 5 A 9 8 7 K Q 6 3 8, while it is cold with the second hand.
When is the hand good enough?
Finally, we can ask the model that we generated to rank the hands on which it has been trained. In Table 1 you find the eleven hands that indicate the percentiles. For clarity: P20 means that the hand is better than 20% of the other hands, and worse than 80% of the other hands. We can also use these hands to see whether our hand-evaluation model is somewhat accurate. We therefore ran these specific hands through a simulation to calculate the average number of tricks, as well as the probability that a slam is actually made. You can find these results in the same table (see the last two columns). You can see that the hand evaluation is not completely perfect (for example, the P40-hand has a 1% higher chance of making slam than P50 and P60), but overall, the valuations are quite accurate.
| Percentile | Hand | Average number of tricks | Probability of 6 |
| P100 | A 3 A K Q 10 4 A 5 4 7 4 3 |
12,43 | 97% |
| P90 | A 9 3 A Q J 8 A 7 J 10 8 3 |
11,93 | 74% |
| P80 | K 9 5 2 J 9 8 5 A K A J 4 |
11,82 | 67% |
| P70 | J 9 4 3 K 9 7 4 A K A 6 4 |
11,70 | 62% |
| P60 | 9 7 4 2 A K 10 6 Q J A K 2 |
11,55 | 53% |
| P50 | A Q 2 8 7 5 4 A J 3 2 A J |
11,50 | 53% |
| P40 | A K Q A J 9 5 J 7 5 4 8 3 |
11,46 | 54% |
| P30 | A 9 7 K Q 9 3 K 5 K 9 8 6 |
11,46 | 49% |
| P20 | Q 7 A Q 9 6 A 7 4 Q J 9 7 |
11,28 | 40% |
| P10 | A 8 2 A 7 6 5 K 8 3 K J 7 |
10,99 | 28% |
| P0 | Q J 3 Q J 7 4 Q J 10 K Q J |
10,11 | 7% |
Table 1: Percentiles of the 1NT opening
An interesting point to discuss with your partner is which action you would take with which hands. Where is the limit for bidding Last Train, and when do you go beyond 4? Perhaps the theoretically optimal limit should be 33% for bidding Last Train, and 66% for going beyond game, although I can also imagine that the latter limit should be a bit higher. Regardless of the theoretical optimum, I would personally sign off with P0-P30, bid Last Train with P40-P60, and I find P70-P100 good enough to go beyond 4.
It is also interesting to compare the P70 and P80 hands. These hands are quite similar, but for the kings and jacks of the major suits. Both the hand evaluation and the simulations show that B is worth significantly more than B.
Some final words
Looking at the problem hand from the introduction, you may have noticed that it is P60. That is to say, according to our hand rating, this hand is better than 60% of the alternatives. Last Train turns out to be the designated action, despite having K and missing spade and diamond controls. With three of the five keycards, support in diamonds, and also a full maximum for our opening, we have a fine hand. Note also that K is supported by A, which makes those points a bit less wasted. Perhaps it can be used to discard a loser of partner. For example, if the cards are positioned like this:
A K 8Q J 4 3K 6 4 3 249 7 4 2A K 10 6Q JA K 2Partner has a fairly average hand for his splinter, but slam is practically ice-cold. With a somewhat weaker hand, for example Q instead of K, slam still has decent chances.
In the next article in this series, we move to partner’s seat and will dive deeper into his situation. What makes his splinter hand good, or not?
 IMP Redactie
 12-04-2026